Get Started with NanoMake Pro
Anand RamaswamiWelcome Back, Maker!
If you’ve just got your NanoMake Pro board, this guide will help you in :
- Installing Arduino IDE
- Connecting NanoMake Pro to PC/Laptop
- Writing your first program (Blink LED)
Let’s get started.
1. Installing Arduino IDE
Before working with NanoMake Pro, you need a development environment.
Step 1: Download Arduino IDE
- Go to: https://www.arduino.cc/en/software
- Download the latest version (Windows / Mac / Linux)
Step 2: Install
- Run the installer
- Keep default settings
- Finish installation
Step 3: Open Arduino IDE
Once installed, launch Arduino IDE.
Step 4: Configure Board (Important)
Since NanoMake Pro is based on Arduino-compatible hardware:
- Go to Tools → Board → Arduino AVR Boards
- Select: Arduino Nano
Step 5: Select Processor
-
Tools → Processor:
- ATmega328P (New Bootloader)
Step 6: Select Port
- Tools → Port → Choose the COM port connected to your board
Note: If no port appears:
-
Install CH340 and CP2102 drivers.
https://sparks.gogo.co.nz/assets/_site_/downloads/CH34x_Install_Windows_v3_4.zip
https://www.silabs.com/software-and-tools/usb-to-uart-bridge-vcp-drivers?tab=downloads
2. How to Connect the Board to PC/Laptop
To program and power your NanoMake Pro, you’ll connect it to your computer using a USB cable.
Required Cable
- Use a USB Type-C to USB Type-A cable
- Type-C → Connect to NanoMake Pro
- Type-A → Connect to your PC/Laptop
Note: Make sure it is a data cable, not just a charging cable.
Step-by-Step Connection
- Plug the USB Type-C end into NanoMake Pro
- Plug the USB Type-A end into your laptop/PC
- The bo
ard should power ON (LED indicator will glow)

Check COM Port in Arduino IDE
Once connected, you need to verify that your system detects the board.
Steps:
- Open Arduino IDE
- Go to Tools → Port
You should see something like:
-
- COM3, COM4, etc. (on Windows)
Select the correct COM port.
How to Identify the Correct COM Port
- Unplug the board → Port disappears
- Plug it back → New COM port appears
That is your NanoMake Pro port
If COM Port is Not Showing
Possible reasons and fixes:
-
Driver not installed
- Install CH340 or CP2102 driver (depends on your board)
-
Wrong cable
- Use a data cable, not power-only cable
-
Loose connection
- Try another USB port
3. Write Your First Code – Blink LED
Now comes the exciting part — your first program!
Understanding the Logic
We will:
- Turn LED ON
- Wait
- Turn LED OFF
- Repeat
This is the “Hello World” of embedded systems.
Code: Blink LED
void setup() {
pinMode(5, OUTPUT); // Set pin D5 as output
}
void loop() {
digitalWrite(5, HIGH); // LED ON
delay(1000); // Wait 1 second
digitalWrite(5, LOW); // LED OFF
delay(1000); // Wait 1 second
}
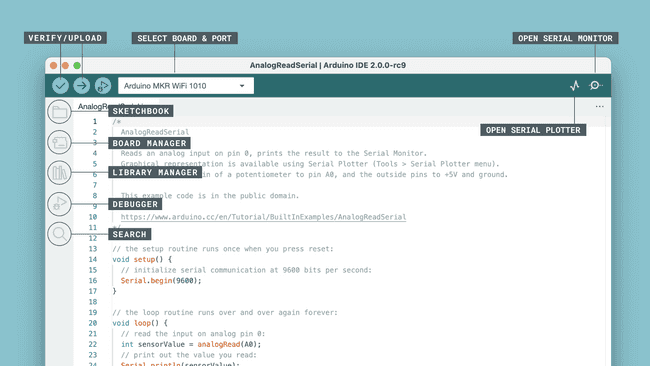
Upload the Code
- Click Verify (✔)
- Click Upload (→)
- Wait for “Done Uploading”
What You Should See
- LED 1 on pin D5 starts blinking
- ON for 1 second
- OFF for 1 second
Congratulations! Your NanoMake Pro is working.
Troubleshooting
Problem: Upload Failed
- Check COM port
- Press reset button once
- Check USB cable
Problem: LED not blinking
- Verify correct pin ??
- Check soldering / connections
Problem: Board not detected
- Install USB drivers (CH340 / CP2102)
And just like that — you’ve taken your first step into the world of hardware and embedded systems.
You didn’t just install software…
You didn’t just plug in a board…
You made a machine respond to your code.
That’s powerful.